Owning a European car is a source of pride and luxury. However, even the most cautious drivers can find themselves faced with unsightly scratches on their car’s bumper. Irrespective of whether it stems from a parking mishap or a minor accident, addressing a bumper scratch is a frequently encountered obstacle. But don’t worry! In this comprehensive guide, we will explore professional techniques to repair bumper scratches on your European car, enabling you to restore its pristine appearance. So, let’s roll up our sleeves and get started!
Assessing the Damage
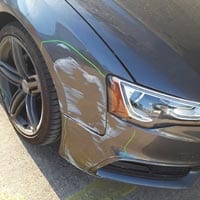 Before embarking on the repair process, it is crucial to assess the severity of the bumper scratch. Some scratches may be superficial and can be easily fixed with simple techniques, while others may require more advanced methods. Take a close look at the scratches and carefully determine their depth, length, and overall condition. This assessment will guide you in deciding the appropriate approach for repairing the bumper.
Gathering the Necessary Tools and Materials for Bumper Scratch Repair
Having the correct tools and materials readily accessible is paramount for repairing a bumper scratch with professional finesse. Here is a list of items you will need for the repair process:
- Microfiber cloth: Use a soft microfiber cloth to clean and buff the bumper.
- Automotive soap or dishwashing liquid: Choose a gentle soap or dishwashing liquid to remove dirt and grime from the bumper.
- Sandpaper of varying grits (800, 1000, 1500, and 2000): The selection of sandpaper with different grits allows you to gradually smoothen the damaged area.
- Automotive primer: Use a high-quality automotive primer that matches your car’s paint color to provide a smooth base for the paint.
- Matching automotive paint: Select an automotive paint that matches the color of your car to ensure a seamless repair.
- Clear coat: Apply a clear coat to protect the repaired area and provide a glossy finish.
- Polishing compound: Use a polishing compound to blend the repaired area with the surrounding paint.
- Optional: Dual-action orbital polisher: A dual-action orbital polisher can be used for more efficient and effective polishing.
- Wax or sealant: Apply wax or sealant to the entire bumper for long-lasting protection against scratches and environmental damage.
Cleaning the Bumper
Before commencing any repair work on the bumper scratch, it is crucial to thoroughly clean the bumper using automotive soap or dishwashing liquid. This step involves removing dirt, grime, and any residues of wax or polish from the surface of the bumper scratch. Thoroughly rinse the bumper and pat it dry with a microfiber cloth.
Sanding the Affected Area
For deeper scratches, sanding the affected area is a crucial step to create a smooth surface for proper paint adhesion. Start with low-grit sandpaper (800) and gradually progress to higher grits (1000, 1500, and 2000). Keep the sandpaper wet and use gentle, circular motions. Exercise caution to avoid sanding too aggressively, as it may damage the surrounding paint. Regularly check the progress of the sanding and stop when the scratched area feels smooth to the touch.
Applying Primer
Once the bumper is sanded and smooth, it is time to apply automotive primer. Choose a high-quality primer that matches the color of your car’s paint. Apply a thin, even coat of primer to the sanded area, following the manufacturer’s instructions. Ensure that the primer is allowed ample time to fully dry before progressing to the subsequent step. Drying times may vary depending on the specific primer used, so ensure that you allow sufficient time for it to cure.
Applying Automotive Paint
Using a suitable applicator, carefully apply a thin layer of matching automotive paint over the primed area. Work in even strokes and ensure that the paint is evenly distributed. If needed, apply multiple coats, ensuring that each coat is given sufficient time to dry before proceeding with the next application. Take your time to achieve a seamless blend with the surrounding paint and ensure a uniform color match.
Applying Clear Coat
To protect the newly applied paint and achieve a glossy finish, apply a clear coat. The clear coat also helps blend the repaired area with the rest of the bumper. Adhere to the guidelines provided by the manufacturer for accurate application techniques and recommended drying durations. Apply the clear coat evenly and avoid excessive buildup or drips. Before proceeding to the next step, ensure that the clear coat is allowed to fully dry.
Polishing and Blending
Once the clear coat has dried, it is time to polish and blend the repaired area with the surrounding paint. Take a small quantity of polishing compound and apply it to a microfiber cloth. Proceed to gently buff the repaired area using circular motions. For enhanced results, you may consider using a dual-action orbital polisher. The polishing process helps smooth out any imperfections and achieve seamless integration of the repaired area with the rest of the bumper. Continue the process until the repaired area seamlessly blends with the surrounding paint, giving it a polished and professional finish.
Final Touches and Protection
To ensure long-lasting protection and preserve the appearance of your bumper, apply a layer of wax or sealant to the entire bumper. This step adds an extra layer of defense against future scratches, UV rays, and environmental damage. Choose a high-quality automotive wax or sealant and follow the instructions for application. Regularly reapply wax or sealant to maintain the protective layer and keep your bumper looking its best.
Prevention Tips
While it is impossible to prevent all bumper scratch, there are steps you can take to minimize the risk:
- Park away from other cars whenever possible: By choosing parking spots that provide ample space, you reduce the chances of accidental collisions or scrapes with neighboring vehicles.
- Utilize bumper guards or protective films: Installing bumper guards or protective films can offer an additional layer of protection against minor impacts and scratches.
- Avoid abrasive car washes and opt for gentle handwashing: Automated car washes with harsh brushes can potentially cause scratches on your car’s bumper. Instead, choose to wash your car by hand using gentle techniques and appropriate cleaning products.
- Regularly inspect and maintain your car’s bumper: Routinely inspect your bumper for any signs of damage or wear. Addressing minor scratches promptly can help prevent them from worsening and requiring more extensive repairs.
Conclusion
Mastering the art of repairing a bumper scratch on your European car like a pro may seem intimidating at first, but rest assured that with the appropriate techniques and materials, it is an attainable endeavor. By following the step-by-step process outlined in this guide, and with the assistance of the best body shop near me, can restore your car’s bumper to its former glory and maintain its pristine appearance. Remember, patience and attention to detail are key to achieving professional-looking results. Take your time, be thorough, and enjoy the satisfaction of a job well done!
Ames Auto Collision Center offers a wide range of auto body and collision repair services. Get in touch with us today! Call (972) 247-6416 and our friendly staff will gladly give you detailed estimates from there we can help you with insurance approval if necessary before commencing the repair.
